OBS: Open Broadcast Software

Live Streaming WITH OBS

A Crash Course For DJs

Let me just start by recommending that you NOT use Streamlabs OBS otherwise known as SLOBS as that application is a cynical rip off of the open source version of OBS. Instead, download OBS from here: https://obsproject.com

INTRODUCTION

Essential Plugins

Source Switcher: moves between sources within a scene  https://obsproject.com/forum/resources/source-switcher.941/

Advanced Scene Switcher: moves between scenes (1 camera per scene) https://obsproject.com/forum/resources/advanced-scene-switcher.395/

Computer Specs

While I did get an old version of OBS running on a 10 year old Intel I7/16GB RAM and SSD this would be the absolute minimum spec but it did support three web cameras so was more than I expected however the CPU ran at around 80% so was fairly fragile once I introduced additional video sources.

The more USB interfaces your PC or Mac has, (that are on their own USB bus) the more sources you can connect.

What Cameras and How To Connect?

A combination of one or more cameras targeting 1080P output is the minimum content quality I would aim for with YouTube. 720P looks terrible on modern large screen TVs and 4K requires a much faster internet connection during a live broadcast (since it’s literally 4x the number of pixels compared 1080) so 1080P is a good compromise. Set the canvas in OBS to 1920x1080 and ensure that all content is the same size. Tip: Resizing 4K content down to 1080 will  make it look crisper as long as the source is high quality.

Web Cams

Are USB connected so easy to manage. They traditionally output 1080P but web cams have very poor low light performance so unless you are using for a face cam close up with a lot of light you’ll need one of the latest models to get anywhere near acceptable video for your decks.

The best options in this space are newer model of 4K camera that you can run in 1080P mode that produce a far superior video quality and can handle some low light conditions. If you use a 1080P web cams you’ll need lot’s of light, way more than you think. The cheaper you go the more difficult tuning these cameras becomes.

DSLR Cameras

This includes DSLR, mirrorless and APC style digital full-frame and micro four-thirds cameras. They often have USB interfaces for streaming or require an HDMI to USB capture device to connect to your computer. Either of these options effectively makes these cameras look like a web cam to your computer so typically no drivers are needed on a Mac (YMMV).

Media Sources

Media sources are the video content you want to loop through during the broadcast. I use three different sources:

  • Cameras (see how to switch between them)

  • Online videos (see how to autoplay YouTube videos from a certain start point)

  • Local Videos (see how to run them in a loop)

The local video are the VJ loops I purchased online. The important thing to note here is that you need enough computer power to run all of these ALL at the same time. This understandably puts a strain on older CPUs with weak GPU performance so the more power you have, the more video sources will run at the same time.

OBS Settings

Bear in mind that there is no one setting that will work on your PC/Mac because it depends on CPU/GPU/RAM/SSD and how much load the various media sources place on these things. With that in mind these settings have been tested on a 2021 M1 MacBook Pro Max 64GB RAM - please understand that just copying these in may or may not work for you depending on many factors. In future editions, I’ll try to provide a more detailed performance guide.

Recording: 7000

Profile: High

Recording:

Filter: Bicubic

Format: Matroska/MP4

Bitrate: 8000/16000

Preset: MaxQuality

Rate: CBR

Encoder: X264

Priority: above normal

Color: NV12

Space: 709

Range: full

Streaming:

Set the Bitrate to 4,000.

Set the CPU usage to veryfast.

Select X264 as your encoder.

What Else Do YOU NEED TO KNOW?

Future crash courses….

Overlays: Displaying track title etc e.g. Prolink software (not to be confused with Pioneer Pro DJ Link)

Lighting: Programming DMX another crash course

Ethernet: ProDJ link and an Ethernet crash course

Audio: Side chain compression for the voice-over mic - how and why

Recording: video with a high quality audio track

Recording: audio as a wav file to external PC/Mac

Image and Video Resolution

Horizontal x Vertical = Pixel Count where the ratio of horizontal to vertical is 16:9

Name Pixels H x V Pixel Count

HD 1280 x 720 0.5K

Full HD 1920 x 1080 1K

Quad HD 2560 x 1440 2K

Ultra HD 4K 3840 x 2160 4K

Ultra HD 8K 7680 x 4320 8K

Camera Models

I have tested these and can recommend the following

2020 Logitech 920e x 2 1080P webcams on USB-A port 1 (bus 1) and USB-A port 3 (bus 2)

2021 Logitech Brio x 2 4K webcams on USB-C hub 1 on port 1 and USB-C hub 2 on port 3

2022 Sony A5000 APS 4K x 2 DSLR on HDMI-USB3 converters

2023 Sony ZV-E10 APS 4K x 1 DSLR USB-C hub

Lighting Gear

Future update on…

DMX Lights

Gig bar

Par, Bar and Laser

Old Versions of OBS

If you are running an older PC/Mac you may need an older version but I would try the latest one first.

Older binaries: https://www.videohelp.com/software/Open-Broadcaster-Software/old-versions

OTHER

Read more: https://www.movavi.com/learning-portal/best-obs-settings-for-recording.html © Movavi.com

OBS Chat Widget:

https://streamlabs.com/widgets/chat-box/v1/9A649EF8026AFB3D1C7F

OBS Viewer Count Widget:

https://streamelements.com/overlay/61219648129051612d409220/eRMM4UVLqZHjXSrzxvzUfL5J4c7lUOSPU1KUkvFAuoPczbq6

Test nested scenes

Custom output FFmpeg audio format AC3 + OBS audio AAC (max bitrate = 320kbps)  AC3 (max bitrate = 640kbps)

Browser Source for Visualisations...

For browser source not visible try Settings, Advanced, scroll to bottom, then uncheck enable browser source hardware acceleration in sources.

Test1 https://www.youtube.com/watch?v=t6jlhqNxRYk

Test2 https://www.youtube.com/embed/t6jlhqNxRYk

Test3 https://www.youtube.com/embed/t6jlhqNxRYk?autoplay=1

Test4 https://www.youtube.com/watch?v=t6jlhqNxRYk?t=60m00s

Test5 https://www.youtube.com/watch?v=t6jlhqNxRYk?start=3600

Test6 https://www.youtube.com/watch?v=t6jlhqNxRYk?t=3600

Test7 https://youtu.be/watch?vWM50XTPkb3g

    https://www.youtube.com/watch?v=WM50XTPkb3g?autoplay=1

OBS "browser" source with youtube. Some suggestions:

- enter the video URL in the "browser" popup box

- if you want the video to start, do you have to add this to the end of the URL “?autoplay=1”

- if you want the video to start in full screen you must replace the text “watch?v=“ with “embed/“ in the URL

  • If you want to start at a certain add “?t=00m00s” to the end of the URL

  • If you want to view at a specific resolution, add “&vq=hd1080” for 1080P

EXAMPLE:

URL = https://www.youtube.com/watch?v=1llpdzed2OE

becomes https://www.youtube.com/embed/1llpdzed2OE?autoplay=1

- now put the check mark on "route audio to OBS"

- also select "reload the browser page when the scene becomes active"
Casio FX880P: Custom Screen Characters

Creating custom screen characters for Casio FX-850P/FX880P

Here’s the standard character table from the User Manual Most of these can be displayed on the screen and/or entered on the keyboard but some require the use of the CHR$ function to display as there is no keyboard equivalent. Wouldn’t it be great if we could create our own custom characters? We can!

FX-850 Char Table.png

As you can see above, the chars 252 to 255 are not defined so we have four memory locations we can use to store custom characters. These are defined using the DEFCHR$ command. A string defines the character containing five hex values, one for each the five pixel columns on the LCD matrix display. 

Example: 

10 DEFCHR$(255)="FF00FF00FF"

This draws three vertical lines. Here’s something I found online; to build a set of custom characters and display them:

10 REM Custom Char Test - Ciao!
20 DEFCHR$(252) = "1824428244"
30 DEFCHR$(253) = "04085C0204"
40 DEFCHR$(254) = "0C120C0204"
50 DEFCHR$(255) = "0C120C00FA"
60 PRINT CHR$(252) + CHR$(253) + CHR$(254)+ CHR$(255)

OK, so how do I define each character? There’s no built-in way of doing that although if you google hard enough, you’ll stumble across this example coded by G. Schwandtner in 1992 called  ASCII-Editor.

While this is a clever piece of coding, it’s a little difficult to follow. To make it easier to understand, I built a tool in Microsoft Excel that provides the codes based on the shape you create and can also build the shape of the character based on codes provided so you can see how it works. 

How Does It Work?

The tool generates the hex codes by converting the binary values in each column to a hex value and then doing a lookup on this value to determine where on the screen it would be drawn.

To create your own custom characters, have a play with the tool and let me know. 

The Excel file can be downloaded here includes an older Excel 95-2003 (.xls) version too.

Note: I avoided using the CONCAT function for backwards compatibility with older versions. If running an older version of Excel you need to enable the Analysis Tool-pack add-in to give access to the BIN2HEX function.

The Casio FX-850P/FX-880P uses a 7x5 matrix array to represent pixels on the LCD display as follows:

Example 1: “C” character matrix

Hex 1 2 3 4 5

80	0	0	0	1	0
40	0	0	1	0	1
20	0	1	0	0	0
10	1	0	0	0	0
08	1	0	0	0	0
04	0	1	0	0	1
02	0	0	1	1	0
00	0	0	1	1	0

Summing the binary values for each column and converting to hexadecimal gives you the 5 hex pair values that construct the 10-character hexadecimal char value 

e.g. 1824428244 is col1 = 10+8 col2 = 20+04 col3 = 40+02 col4 = 80+02 col5 = 40+04

So reading down column 1 from top to bottom as binary 00011000 —> 0x18 hex

Example 2: “Race car”

In the spreadsheet, you can type in your own binary values inside the box provided using zeroes or ones and it will calculate the hex string and generate the character from that:

CustomChar-02.png

Which produces an example LCD output:

CustomChar-03.png

Once you’ve created a new character, here’s the code to see what it looks like on the calculator screen:

10 REM Custom Character Demo - Hearts
20 DEFCHR$(252) = "1834123418"
30 DEFCHR$(253) = "183C1E3C18"
40 REM Custom Character Demo - Race Cars
50 DEFCHR$(254) = "CC527E52CC"
60 DEFCHR$(255) = "2C527E522C"
70 PRINT CHR$(252) + CHR$(253) + CHR$(254)+ CHR$(255)

Casio FX-880P: Reading and Writing Programs

Saving and loading programs on a Casio FX-880P

This post refers to the following Casio programmable calculators:

FX-840P, FX-841P, FX-850P, FX-860P, FX-860Pvc, FX-870P, FX-880P, FX-890P, VX-1, VX-2, VX-3, VX-4, Z-1, Z-1GR, FX-603P

These calculators are compatible with the Casio FA-6 Cassette Interface however given the rarity of that hardware, and the difficulty in using magnetic tape to record and playback the software on these, I though I’d explore various ways of transferring data to and from these calculators.

Option 1 Cassette Interface

Buy the FA-6 cassette interface that has a serial interface built in or use the cassette interface to capture the data as audio, not recommended.

Option 2 Build Your Own Cable

You can find the specs online to build your own serial cable like this guy did:

http://blog.damnsoft.org/rs232-ttl-adapter-for-vintage-fx-casio-calculators/

Notes on making a custom connector

Or another method…using the parallel cable and LPT on your computer:

Take a cable like that connecting your printer to the parallel port of your PC. This should have 25 pins on the PC side and 36 pins on the printer side.
Open the printer connector and search for the numeration of the pins, from 1 to 36. Write the colours of the cables connected to pins 2, 10, 11 and 19.
The connector of your calculator should have 30 holes, and you can adopt this for them using only the four noted above that need to be connected to the calculator like this:

Casio Pin↔PC LPT Pin—>Signal

5↔2 —>Data

21↔10 —>ACK

22↔11 —>Busy

30↔19 —>GND

However, most of us don’t have electrical expertise so that’s why I recommend…

Option 3 Casio Serial / USB Adapter

This is the adapter I bought to connect the somewhat proprietary Casio connector RS-232/serial port:

https://www.casio880.com/en/product/interface-cable-for-calculators-casio-fx-880p-and-fx-850p/

or here:

https://www.ebay.com/itm/Cable-Interface-USB-Casio-FX-880p-FX-850p-etc-FA-6-/162315613859

At the time of writing, these are listed for 65-70 Euro. This calculator is designed to connect to the FA-6 cassette interface and that provides audio, serial and parallel ports to save and load programmable content to and from the calculator.

If you are still interested in using the audio interface to save and load , stay tuned for a future blog post on that one.

Ideally your Windows PC or Mac has a physical serial port but these days, that is very unlikely unless your machine is very old. I tested this running Windows 7 using VMware Fusion on a Mac but it also applies to any Windows PC running Windows 7 or newer.

If you have a Windows PC you should be able to plug in the USB/Serial Adapter and the drivers should load automatically. If you are on a Mac read the next section on configuring that using VMware.

VMware and/or Windows Serial Port Configuration

  1. Enable serial port in (VMware) BIOS

  2. Add serial port to list of devices

  3. Power up the (virtual) machine

  4. Plug in the USB / Serial adapter

When prompted, choose to connect it to the Windows guest (not the Apple host in my case).

Windows should add a driver, mine tried to download one via Windows Update but failed so I downloaded FTDI drivers from here:

https://cdn.sparkfun.com/assets/learn_tutorials/7/4/CDM21228_Setup.exe

or visit here

https://www.ftdichip.com/Drivers/VCP.htm

and do a manual driver update/install.

Check Device Manager to see if the COM ports show up and are configured. There should not be a question mark next to the serial port or USB ports listed there.

I installed drivers in Windows 7 32-bit and device manager now sees both a Communications Port (COM1) and a USB Serial Port (COM3). I think it allocated COM3 as the BIOS reserves COM1 and COM2 in “hardware” so it allocates the next available port but some machines allocate a high number like COM15 or higher.

To see which ports you have available, start the Command prompt as Administrator from the run box on the start menu. Then run the MODE command which will display all CON and COM ports available to the machine.

MODE

You should see the serial port(s) added to the virtual serial port; in my case COM3. This was enough to get it working for me however, the VMware documentation says you may need to tweak the BIOS settings to get his to work so YMMV.

The operating system also has default settings for the COM port so you need to configure it to match either the calculator defaults or the settings you use when connecting. I used 2400, N, 8, 1. To set the COM3 port to this, run the following on the command line as administrator:

MODE COM3 BAUD=2400 PARITY=N DATA=8 STOP=1

Test load from the prompt prompt by opening the LOAD command on the calculator and type this at CMD prompt: 

set /p x="10 PRINT Testing" <nul >\\.\COM3

Calculator Configuration

Note: if you change the calculator batteries you should change either the large ones or the small one to preserve the memory and any programs. If you have wiped the whole thing or the batteries are both completely flat, replace the CR2023 batteries and press the reset button on the back after you first power it up. You may need to press All Clear on the front as well then you can use the calculator again. 

Casio RS-232 Serial Interface Specs

The Serial Interface is asynchronous full-duplex that is configured as a set of parameters either on the “command line” of the calculator or in code that is executed at run time. 

Port		: COM0
Baud rate	: 300 bits/second
Parity		: Even
Data bits	: 8 bits
Stop bit	: 1 bit
CS		: not used
DS		: not used
CD		: not used
Busy		: XON/XOFF
Code		: SI/SO not used

The default values for all parameters are COM0:2,E,8,1,N,N,N,B,N

Casio RS-232 Serial Interface Syntax

Example 1

10 REM Send to serial port

20 OPEN “COM0:2,E,8,1,N,N,N,B,N” as #1

30 PRINT #1, “HELLO”

40 CLOSE

Example 2

10 REM Receive from serial port

20 OPEN “COM0:2,E,8,1,N,N,N,B,N” as #1

30 INPUT #1, A$

40 CLOSE

Example 3

Write the contents from program area P0 to the computer on the connected COM port at 2400 baud

Mode 1 SAVE "COM0:5,N,8,1"

Example 4

To write the contents from the computer COM port at 2400 baud to program area P0

Mode 1 LOAD "COM0:5,N,8,1"

Example 5

Read from COM port and write to P0 at 4800 baud

Mode 1 LOAD "COM0:6,N,8,1"

Notes on Baud Rate

With 1 start bit, 1 stop bit, 8 data bits and no parity bits there are 10 bits/baud. 300 baud *10 = 3000 bits/second or almost 3Kb/s or 3000/8 bits = 375KB.

# = Baud Rate

1 = 150

2 = 300

3 = 600

4 = 1200

5 = 2400

6 = 4800

Cassette Interface syntax

CAS0 = Positive Phase (default setting)

CAS1 = Negative Phase

e.g. read a file named TESTFILE using positive phase at 300 baud

OPEN “CAS0:(S) TESTFILE” FOR INPUT  AS #1

e.g. write file named SAMPLE at 1200 baud

SAVE ”CAS0:(F) SAMPLE”
LOAD"(S)" 300 baud
LOAD”(F”) 1200 baud

MacOS USB/serial adapter detect

ls /dev/cu*

Then use the right “serial” port for the terminal session e.g.

screen /dev/cu.usbserial-12345678 2400

Ctrl-A Ctrl-\ Y to quit

or

minicom -s

and select the COM port settings then press Esc to initialise the modem

Ctrl-A Q to quit.

Add Sound To Windows 3.1

Configure Sound Blaster 16 Drivers for Microsoft Windows 3.1

Note 1: applicable to Windows 3.1 and Windows 3.11

Note 2: you may be running it on physical hardware or VMware Fusion or VMware Workstation

Note 3: this will not work on Windows 3.0

Step 1: Backup

Make sure you backup your Windows machine (either virtual or physical) as this may save some grief if things go wrong later.

Step 2: Download the SB16 Drivers

Download the legacy sound card drivers from Creative. Search for Creative Sound Blaster 16 drivers or download directly from:

https://support.creative.com/downloads/welcome.aspx

The file we need is called SBBASIC.EXE, download it and copy it to a floppy disk or disk image. 

Step 3: Extract Files

Create a directory to contain the Sound Blaster files called SB16, change to it with the CD command and then run the executable file we downloaded previously. Start your Windows machine and exit Windows back to the DOS prompt then type the following DOS commands:

MD C:\SB16
CD C:\SB16
A:SBBASIC

Step 4: Installation

You should still be at the DOS prompt in the C:\SB16 directory. Run the SB16 Windows driver installation program. Yes, it’s run from DOS to work in Windows…I know, those were the days alright!

INSTALL

You may get an error message saying insufficient memory.

SB16 -01.png

In that case unload the CD-ROM driver and disable SMARTDRV if Windows has automatically configured that. Do this by putting remark statement (REM ) at the start of the line where smartdrv is in both CONFIG.SYS and AUTOEXEC.BAT.

Reboot and run the install from C:\SB16 as above

SB16 -02.png

Press Enter at the first screen to continue and press Enter again at the second screen to accept the default directories.

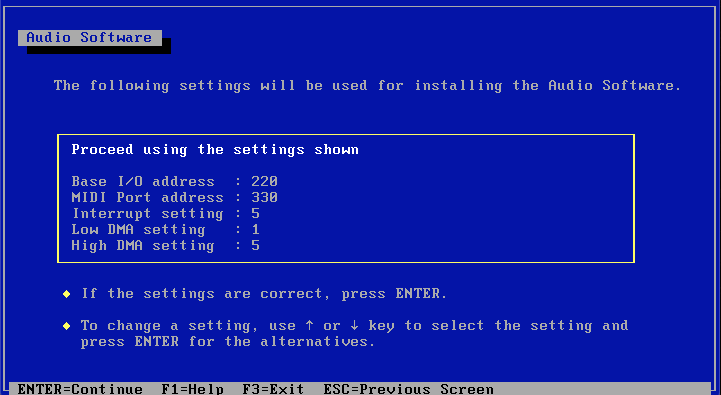
I used the hardware defaults as shown here:

Port: 220, MIDI 330, INT 5, LDMA 1, HDMA 5

Feel free to change them if you are:

  • brave

  • know what you are doing

  • have actual hardware with different settings

  • all of the above

SB16 -04.png

Press Enter to accept the remaining default values and if you have a more or less standard autoexec.bat and config.sys I would let the installation make changes to lose files too as it backs them up so you can go back if something breaks.

SB16 -05.png

Step 5: Test

Restart your machine. If Windows does not start, all is not lost! This may be because you were fiddling with the Sound setup in Control Panel previously and Windows is now confused. To straighten things out we’ll need to run Windows Setup to check what went wrong. Exit Windows back to the DOS prompt and type the following DOS commands

CD\WINDOWS
SETUP

Just accept the defaults by pressing Enter. When setup exists back to DOS, start Windows by typing:

WIN

Hopefully Windows made a sound when it started! There should be a new Program Group created called Audio Software but first go to Control Panel, Sound and click the Test button to see if the various sound files are playable. 

SB16 Win31.png

Step 6: Check VMware Config

If it’s still not working and you are running Windows with VMware Fusion or VMware Workstation, you may need to tweak the hardware settings of your virtual sound card to match those you chose during the installation (see above).

You can do this by editing the .VMX file which may need more or more of these entries, and they need to match the settings you chose during the install step above:

sound.present = "TRUE"
sound.virtualDev = "sb16"
sound.opl3.enabled = "TRUE"
sound.baseAddr = "0x220"
sound.dma16 = "7"
sound.dma8 = "1"
sound.irq = "5"
sound.mpu401baseAddr = "0x330"
sound.Opl3BaseAddr = "0x388"
sound.fileName = "-1"
sound.autodetect = "TRUE"

Create Floppy Disk Image (MacOS)

Appendix B: Creating Floppy Disk Image Files (MacOS)

Creating Floppy Disk Images

Create a 1.44MB 3.5” floppy image

dd if=/dev/zero bs=512 count=2880 of=floppy.img

Create a 720KB 3.5” floppy image

dd if=/dev/zero bs=512 count=1440 of=floppy.img

This diskette can be formatted in the guest operating system or on your Mac and files can be copied to it and removed from it once it’s mounted. To mount it, open Disk Utility

File, Open Disk Image, Select the file you created above.

Add or remove files to/from the floppy disk image using the Finder. 

When finished just Eject it like any normal removable drive in the Finder.

Note: the name of the floppy image is the name of the disk volume from when the floppy image was created. If you want to change this you’ll need to reformat the drive (which will delete all data so back it up first!). 

Formatting the diskette image from the DOS prompt:

\DOS\FORMAT A: /V:VOLNAME

 where VOLNAME is the name of the floppy when mounted and is displayed when listing files on it using the DIR command..

Vintage O/S: CD-ROM access from DOS

Reading a CD-ROM in DOS

A previous blog post discussed how to create a CD-ROM or DVD image as an ISO file. Accessing these images is easy if you have a Windows or Linux based operating system but what about MS-DOS?

This guide applies to physical CD-ROM drives as well as virtual ones if used in a hypervisor. To copy files from a CD-ROM disk or from an ISO image of one, we need to access it as a drive letter in DOS.

By default DOS represents the first floppy disk a drive A: and the second floppy disk as drive B: the first hard disk is drive C: so we want to allocate a drive letter to the CD-ROM. 

To do this, we need to load a device driver in CONFIG.SYS and then call it using the Microsoft CD-ROM Extension for DOS from AUTOEXEC.BAT.

There’s a few different drivers out there. I’ve tested the DOS OEM Adaptation Kit, OAK, LG and IBM CD drivers for DOS. After copying the driver files and MSCDEX.EXE to a directory called C:\DOS\CD, here’s the config details.

Note: a copy of MSCDEX.EXE is usually found on the DOS or Windows disks or on the Microsoft DOS CD-ROM support diskette if you have a copy.

Load the CD driver in the CONFIG.SYS but put it after the memory management drivers near the end of the file (may need LASTDRIVE=Z entry). In this example I’ve called it “CDDRIVER” but you can name it anything up to eight characters long :

DEVICE=C:\DOS\CD\OAKCDROM.SYS /D:CDDRIVER /L:X

Call “CDDRIVER” and allocate drive letter X by adding these two lines to AUTOEXEC.BAT:

C:\DOS\CD\MSCDEX.EXE /D:CDDRIVER /L:X
DEVICE=C:\DOS\CD\MSCDEX.EXE /D:X 

Reboot the machine, load or connect a CD and have a look at the file listing on drive X:

DIR X:

Done!

Create ISO File (MacOS)

Creating CD-ROM or DVD Image Files (MacOS)

If you experiment with vintage operating systems like I do, you’ll often need to transfer files to and from the PC. Whether this is a physical old PC or a virtual one, there is likely a time where you need to transfer files and don’t have access to a network to share the files to or from.

This is where CD-ROM images and Floppy diskette images come in handy. I’ll cover off floppy disks tomorrow but for today, let’s create a CD-ROM image from content on our local machine for use in a vintage PC build.

Creating an ISO image from Files or Folders

Step 1: Create a CDR file from Existing Files or Folders

Open the Disk Utility application (in the Utilities folder under Applications)

File,

New Image

…from Folder

Name the .CDR file e.g. WORD11A and choose a suitable file location

Choose CD/DVD Master (not hybrid CD-ROM)

No encryption

Click OK

Step 2: Convert .CDR File to .ISO File

Now that the .CDR file is created, we need to convert it to an ISO file. We can do this from the command line so open Terminal and change directory to the same folder as the .CDR file…then type:

hdiutil makehybrid -iso -joliet -ov WORD11A.iso WORD11A.cdr

That’s it!

This image can be mounted using Disk Utility but you can’t add files to it as it’s flagged as Read Only. If you need to change it, just change the files in the folder used to create the image and create another one.

Step 3: Review Content

To view content, mount the ISO file using Disk Utility 

Open Disk Utility

File, Open Disk Image, browse to your ISO file (this will mount the ISO file so you can read it)

Click OK. Now that it’s mounted, you can browse the files on it using the Finder.

When finished just Eject it like any normal removable drive in the Finder.

How to add .WAV music to iTunes

Hi there, first of all there is no easy or fast way of doing this in bulk without buying software. However, with a little elbow grease you can do this yourself manually.

I'm assuming you need to do this to add files you may have backed up from CDs that you own. I'm also assuming you're using WAV files as they are lossless and you want to preserve the sound quality of the music in these files.

For that reason I'm not going to ask you to convert these files to an MP3 and import them as that would defeat the purpose. 

OK, ready? We are going to use a feature that first appeared in iTunes 9 back in 2009 called Automatically Add to iTunes. Quoting from the Apple support article:

"When iTunes-compatible content is placed in this folder, iTunes analyzes it for compatibility and adds it to your iTunes library. If a file is not compatible, iTunes places it in the Not Added folder."

If your version of iTunes is older than v9.0 you really should upgrade.

Right, off we go...

Step 1. Start iTunes

Easy! 

Step 2. Locate the "Automatically Add to iTunes" folder

We are going to use the auto-import feature to add songs one album at a time which means we need to find the magic "auto-import" folder. If you are on a Windows machine, open Explorer (Start, Run, explorer) and navigate here:

C:/Users/Your Username/Music/iTunes/iTunes Media/Automatically Add to iTunes

Windows users note: if you upgraded from iTunes 8 or earlier to iTunes 9 then the "iTunes Media" folder may be called "iTunes Music".

If you are on a Mac, click the Finder on the dock and navigate here: 

~/Music/iTunes/iTunes Media/Automatically Add To iTunes

If it's not in one of these expected locations, you may have a different hard disk configuration or have moved it somewhere to make space. Use your operating systems search tool to locate it.  

In my case I migrated my iTunes database from my Windows laptop to a custom location on my Mac. I'll describe how to do that in a future post. 

Step 3. Drag 'n' Drop

Open another explorer window (or finder window) and find the music you want to import. You can select the folder that the album is in, drag it to the  "Automatically Add to iTunes" folder and drop it there!

But wait. Were not quite there yet.  

Step 4.  Find 'em

Now we need to go back to iTunes to see where the files ended up. You have iTunes still running right? Never fear, if you did shut down, iTunes will grab the files from that folder as soon as it starts. Cool eh?! 

In iTunes, have a look for the sidebar menu on the left called "Recently Added". Not there? OK, iTunes 11 hid the side bar from the default view. To see the sidebar, go to the View menu and choose "Show Sidebar". You may want to choose "Show Status Bar" while you are there.

OK, so when you click the sidebar menu called "Recently Added" you see a whole bunch of files with no album art and it's a bit of a mess. Never fear! We can clean this up.

Step 5. Gather 'em Together

Select all the files from the album you just imported. You can do this by Control-Clicking (Windows) or Command-Clicking (Mac) each of the files from the album.

Once they are all selected, right-click (Windows) or Control-Click (Mac) and choose "Get Info". Right, this is the trick. All the album files are selected now, so any details you edit here will be added to each selected track. As a minimum you should add the Artist, Album Title and Year.

By default each track will have its name prefixed with the track number so if you are real keen (or just nuts like me) you'll edit all the track titles and the track numbers to match as well. 

Click OK and all the files should appear gathered together in the same album. If you have a few stranglers it may that they have not be selected the first time. No problem, just click the new album then right-click (Windows) or Control-Click (Mac) the orphaned files and edit again. Try adding an "Album Artist" to all tracks to ensure they are gathered together in one multi-disk album. 

Step 6. Album Art

OK, the final step is optional but you may want to add album art to make it look all purdy. right-click (Windows) or Control-Click (Mac) the album and select "Get Album Artwork". It should add the correct album cover from the Apple iTunes database.

Having said that,  there's a bit of a knack to getting this to work consistently. I'll walk through that trick in a future blog post.

Any questions, just leave a comment below or message me directly from the contact page of this site.